Hi All,
Just a little glamour shot of a few figures I had handy and some of the dungeon tiles I printed.
I've been alternately using the airbrush or brush for priming and like them better primed black.
Many of these were varnished and used for the photo. I've been using the airbrush to varnish them. Again to learn how to use the airbrush.
Just a little shot of the production line. Current process. Base coat black. Drybrush Charcoal, Hippo Grey, Rainy Grey. Spot drybrush Burnt Sienna and Territorial Beige. Sponge on Forest Green then Slate Green. Done. All of the paints are Delta Ceramcoat except for The Black and Slate Green, which are Americana (Or Vallejo Black Primer).
Thanks for looking.
Showing posts with label Fat Dragon Games. Show all posts
Monday, April 20, 2020
Thursday, April 9, 2020
Hobby Update: Social Distancing Style
Hi All,
I realized that it's been awhile so I thought I'd jump in and give you an update of sorts. It's been a whirlwind of ups and downs as cabin fever sets in and things seem to be not working at times.
First, here's the progress on my Worldographer map.
I know, you're probably asking yourself "isn't this the same exact map he showed last time?" Yes and no. I went for the full map being delineated by the smallest hex size I wanted to use. So each hex generated by the program is 6 miles across. All of the coastlines and rivers are done as polygons to get the shapes I wanted. You can see I've put in the border of Monfel in the upper Left area. It more or less follows the area of the hexes from the hand drawn map.
Once I get in more of the borders and settlement I can start tweaking the boundaries and terrain. For instance I need a lot more tributaries for those rivers.
I've been running into a weird issue where I seem to be overloading the program and it will tell me I'm out of memory. I can't save of export or anything. Closing and restarting seems to fix it, so I just try to save my work often.
3d Printing has been going apace. I had a lot of trouble transitioning to the glass bed. It turned out that I needed to lower my bed temperature from 50C to 40C and use glue stick to get prints that didn't come off in the middle of the print, not stick altogether or warp horribly as the layers cooled at different rates. I also adjust some parameters of when the cooling fan came on, but I think bed temp was more important. The main thing is, there is a ton of advice out there and you have to be willing to try different things to find what works for you. Just because other people say xyz works for them it may not work for you.
One of the things I did was print some upgrades for my Ender 3. I found all of them on thingiverse here.
The vent fan cover redirects the airflow so it is not going straight up at the bottom of the left side of the bed.
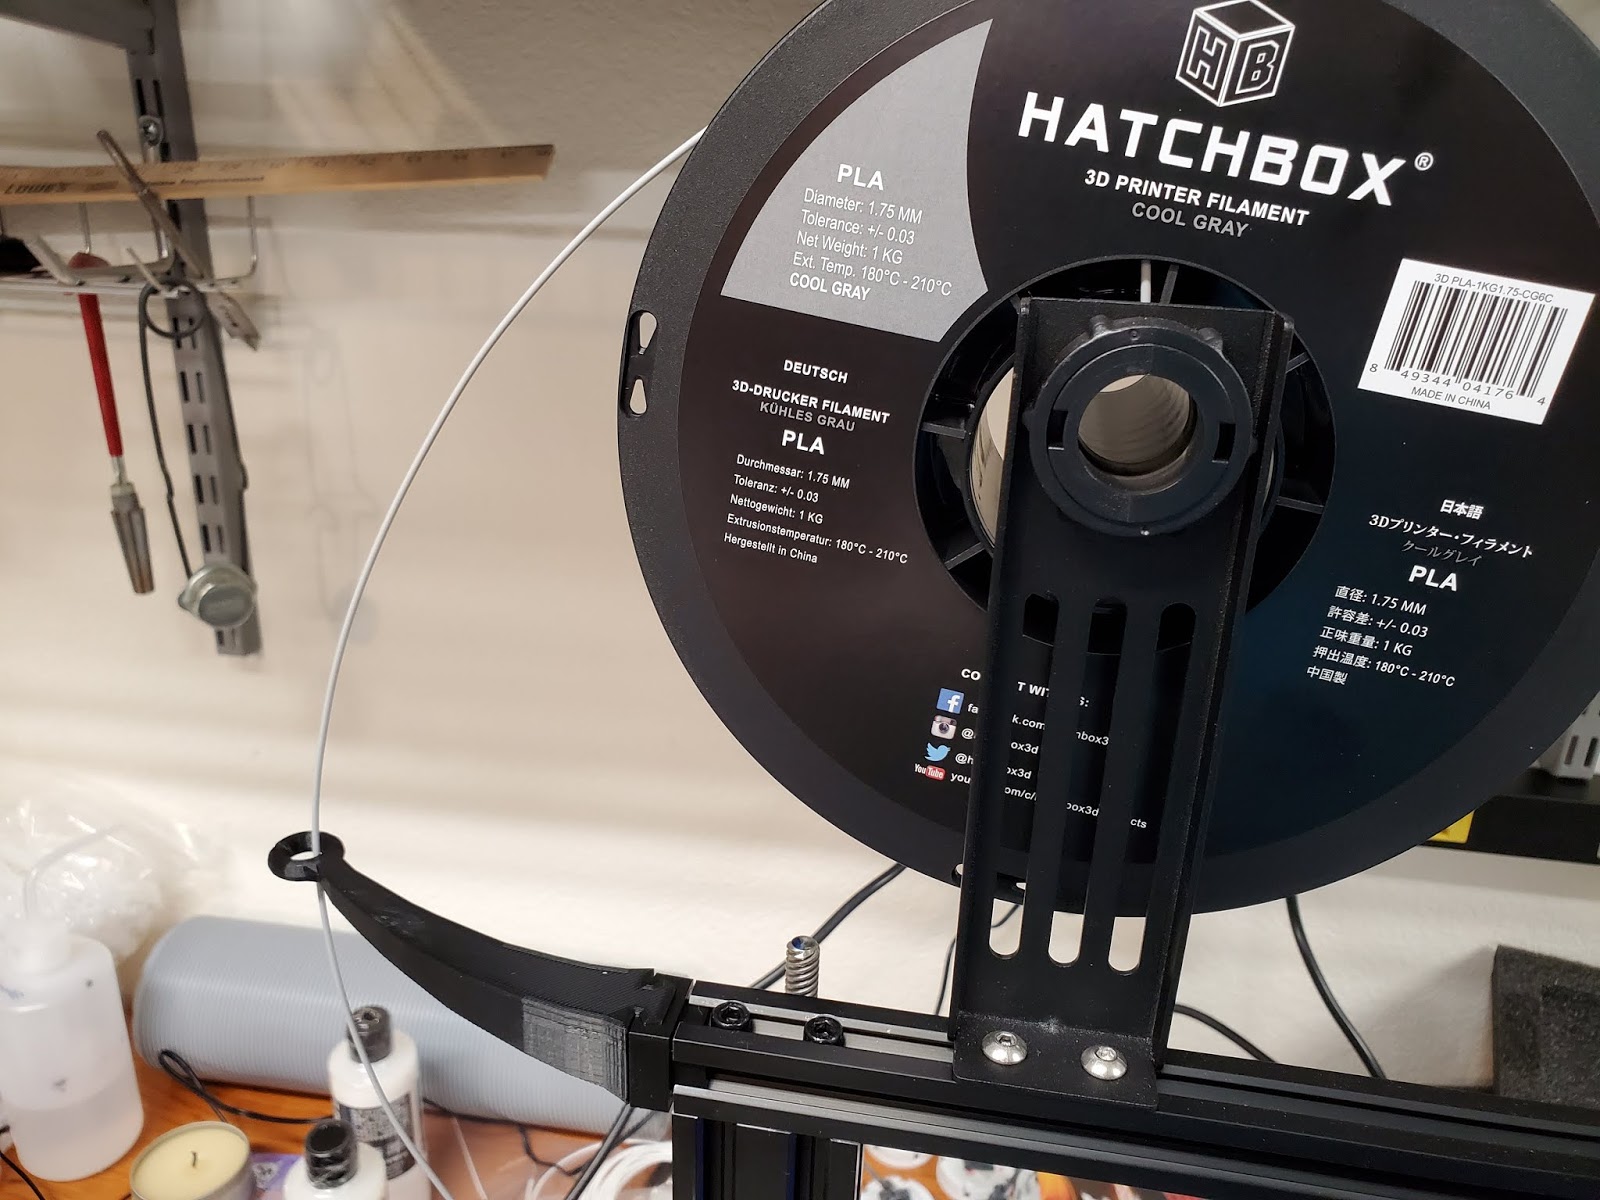
The filament guide seems to help with unspooling the filament so you are no longer pulling straight down.
I found this tool rack very helpful. As you can see, I'm sort of a slob. Now I can find all the tools when I need them. As long as I put them back in the organizer.
Lastly, I printed this filament guide. As you can see, I ran out of Black filament before printing it. Oh well. I printed it at 0.2mm, so that's why it may look a little rough. It's hard to see in the picture, but I did wear a groove in the plastic around where the filament goes into the feed. I din't see it until after I had switched to grey filament. Hopefully this guide will fix that so it doesn't continue to happen.
Hope this helps you if you're having trouble with your printing projects.
Thanks for looking and commenting.
I realized that it's been awhile so I thought I'd jump in and give you an update of sorts. It's been a whirlwind of ups and downs as cabin fever sets in and things seem to be not working at times.
First, here's the progress on my Worldographer map.
I know, you're probably asking yourself "isn't this the same exact map he showed last time?" Yes and no. I went for the full map being delineated by the smallest hex size I wanted to use. So each hex generated by the program is 6 miles across. All of the coastlines and rivers are done as polygons to get the shapes I wanted. You can see I've put in the border of Monfel in the upper Left area. It more or less follows the area of the hexes from the hand drawn map.
Once I get in more of the borders and settlement I can start tweaking the boundaries and terrain. For instance I need a lot more tributaries for those rivers.
I've been running into a weird issue where I seem to be overloading the program and it will tell me I'm out of memory. I can't save of export or anything. Closing and restarting seems to fix it, so I just try to save my work often.
3d Printing has been going apace. I had a lot of trouble transitioning to the glass bed. It turned out that I needed to lower my bed temperature from 50C to 40C and use glue stick to get prints that didn't come off in the middle of the print, not stick altogether or warp horribly as the layers cooled at different rates. I also adjust some parameters of when the cooling fan came on, but I think bed temp was more important. The main thing is, there is a ton of advice out there and you have to be willing to try different things to find what works for you. Just because other people say xyz works for them it may not work for you.
One of the things I did was print some upgrades for my Ender 3. I found all of them on thingiverse here.
The vent fan cover redirects the airflow so it is not going straight up at the bottom of the left side of the bed.
The filament guide seems to help with unspooling the filament so you are no longer pulling straight down.
I found this tool rack very helpful. As you can see, I'm sort of a slob. Now I can find all the tools when I need them. As long as I put them back in the organizer.
Lastly, I printed this filament guide. As you can see, I ran out of Black filament before printing it. Oh well. I printed it at 0.2mm, so that's why it may look a little rough. It's hard to see in the picture, but I did wear a groove in the plastic around where the filament goes into the feed. I din't see it until after I had switched to grey filament. Hopefully this guide will fix that so it doesn't continue to happen.
Hope this helps you if you're having trouble with your printing projects.
Thanks for looking and commenting.
Monday, March 30, 2020
3d Printapalooza
Hi All,
Hope your social distancing is going well. Mine has been ok. As usual a lot going on, but not a lot finished. I'm hoping that changes soon.
As mentioned in the title, I've pretty much been printing non stop since my last post.
I found out what happens when you have really, really good adhesion to the print bed. A little super glue fixed that right up.
My order of replacement bed parts came in sooner than expected. If you order from Amazon these days you can get some pretty long estimated delivery times for some items. Pictured above are the super skinny replacement mat, the glass plate I was going to upgrade to, and the stock binder clip that holds neither due to the thickness differences from the stock mat. Someone on facebook suggested Swiss Frame clips, so I have some on order. Later someone suggested painters tape to hold it and I wondered why I didn't think of it. Currently I'm printing with the skinny mat on top of the stock mat that I accidentally carved a chunk out of trying to pry my prints up.
I've been having issues painting these. I decided to take this opportunity to learn how to use the airbrush. It's going ok.
I've gone through my first kilogram of filament and moved on to the black filament. I found out that grey is the cheapest option of all, so I have 2 more spools on their way. As you can see I've also gotten bolder with my prints. I'm now printing all 6 wall variations at one time. Cura 4.5 said it would take just over 21 hours, but it has been taking about 19.5. I did try to weld the black to the white, but my join popped apart once it got to the filament feed. Fortunately I was printing clips and the print finished with about a foot of white filament to spare. That's an acceptable loss to me.
And finally, I'd like to welcome XarfaiEngel to the blog.
Thanks for looking, hope you are making headway into your miniature piles.
Hope your social distancing is going well. Mine has been ok. As usual a lot going on, but not a lot finished. I'm hoping that changes soon.
As mentioned in the title, I've pretty much been printing non stop since my last post.
I found out what happens when you have really, really good adhesion to the print bed. A little super glue fixed that right up.
My order of replacement bed parts came in sooner than expected. If you order from Amazon these days you can get some pretty long estimated delivery times for some items. Pictured above are the super skinny replacement mat, the glass plate I was going to upgrade to, and the stock binder clip that holds neither due to the thickness differences from the stock mat. Someone on facebook suggested Swiss Frame clips, so I have some on order. Later someone suggested painters tape to hold it and I wondered why I didn't think of it. Currently I'm printing with the skinny mat on top of the stock mat that I accidentally carved a chunk out of trying to pry my prints up.
I've been having issues painting these. I decided to take this opportunity to learn how to use the airbrush. It's going ok.
I've gone through my first kilogram of filament and moved on to the black filament. I found out that grey is the cheapest option of all, so I have 2 more spools on their way. As you can see I've also gotten bolder with my prints. I'm now printing all 6 wall variations at one time. Cura 4.5 said it would take just over 21 hours, but it has been taking about 19.5. I did try to weld the black to the white, but my join popped apart once it got to the filament feed. Fortunately I was printing clips and the print finished with about a foot of white filament to spare. That's an acceptable loss to me.
I also stumbled upon Dungeon Print Studio for helping me plan out what to print. Since I want to use these for Advanced Heroquest, I figured I'd try my hand at making some of the quest levels for The Shattered Amulet Campaign. It took some fudging as AHQ has some different dimensions than the Fat Dragon tiles. But I think I got it pretty well. The cool thing about this site is it also has other Fat Dragon Sets as well as other manufacturers models so you can plan out a lot of stuff. It then lets you print out a list of parts you need to print. Pretty cool. The one down side, more of a bummer really, is that I found out that the Fat Dragon space tiles I bought are not really going to work for Space Hulk. At least not without some modifications that I am not able to make at this moment
And finally, I'd like to welcome XarfaiEngel to the blog.
Thanks for looking, hope you are making headway into your miniature piles.
Subscribe to:
Posts (Atom)