Showing posts with label 3D Printing. Show all posts

Sunday, September 6, 2020

Hot End Swap for Creality Ender 3

 Hi All,

As I've mentioned, I've been printing a lot on my Ender 3. Unfortunately I missed that the bowden coupler on the hot end had worked loose. This must have caused a gap between the end of the bowden tube and the nozzle which lead to a clog. I cleared out the clog and replaced the bowden tube which had partially melted. Unfortunately the next print clogged as well and a second cleaning attempt lead me to believe that the inside of my heat sync was gunked up and I didn't have confidence that I would be able to get the bowden tube to seat correctly and prevent further clogs.

So after a little research into various hot ends I decided to just go ahead and order a replacement stock one. This particular model has the upgraded Capricorn bowden tube.

I should say here, unplug your printer and it's probably a good idea to pull the sd card as well, just to be on the safe side.


So the hot end is very easy to pull off. Just those two screws pull it off. In the picture you can see I broke down the old one even further. You don't need to do that, I just did when I was trying to figure out what was going on with the old one.


What I didn't show was my clipping all the zip ties. One at the hot end, tightening the wires and cover. Two holing the bowden tube to the wire trace, and a fourth one that was inside the motherboard case holding that end of the wiring together.

Above you can see where I removed the old hot end control wire. Supposedly it's labeled, but I couldn't read it. I also noted after I pulled it that the manufacturer had hot glued the connector in. So you may want to remove that glue first.


The last two terminals in that strip are to connect the heating element for the nozzle. The screw driver you get with your printer tools loosens these. This picture also shows that I have fed the new wires back through the plastic mesh wire tube.


At this point I was having trouble getting the heater cables into the wiring block so I decided to remove the motherboard from the case. It is held in by four pretty stiff screws. I also had to remove the bed plate to really get at it.


This last picture is just to show how you want to insert the stripped wire end above the little metal piece. Tightening the screw will pull it up and make a tight connection with the wire.

I then put in new zip ties in the places where I removed them. Perhaps I should have documented the removal and replacement.

Button everything back up and test it out. You should be good to go.

I still need to run some test prints and dial my settings in. I've printed two scenery pieces since installing this and there are some print flaws right now. I'll let you know what I had to change.

Thanks for looking.


Monday, August 31, 2020

What's on the Workbench.

 Hi All,

I'm sorry for the lack of posting. Things have been really busy both in hobby and real life, but blogging and keeping up with blogs has really fallen by the wayside.

My latest gamer ADD thing are these Corvus Games Terrain buildings.


These are the thingiverse freebies of the upcoming Isolation Protocol Kickstarter. They use the Waylayer system and I think they look great.


This is the Sector Corvus Prime Openlock freebie from thingiverse. It got me to buy the whole Sector Corvus Prime Bundle. So you'll be seeing that soon I hope.


And this is the Sector Corvus Prime Warlayer style building. Ignore the tile on the bottom, I had a clog that caused a print failure.

So I'm jumping around printing this and some fantasy streets for a Mordheim board. I also need to get on printing the Mortis Vallis Kickstarter, but I'm fixated on printing some sci fi stuff and getting it on the table.

Got some stuff in the pipeline, so stay tuned.

Sunday, May 31, 2020

Editing STL files - Necromunda

Hi All,

So you may or may not have seen these great Sci Fi buildings that Bulldoglopez and Axiom have been building out of old Necromunda bulkhead sections.

Now I had thought that Bulldoglopez had blogged about it, I was wrong. Axiom, however, has here. In fact, he is such a consummate gentleman he has blogged Bulldog's as well at the end. I'll wait while you read it. When you do you'll realize why I got excited about hab building.

My first issue was that I didn't have any of the old Necromunda tiles. What's a guy locked in his house with a 3d printer to do? 

First, search the term "Necromunda Bulkhead" on Thingiverse. I tried several and they had real problems with ovehangs straight out of the box. I had to figure out how to get usable prints. After failing with the split, flat on the build plate, files I figured I could cut the vertical files in Meshmixer. 


I still had to print with supports, but  it seemed to print fairly well.


Not too bad, but those supports are a pain to get out.


So back to the drawing board and fix those parallel to the build plate files. That handle had to go. it started on the third layer and just made it a nightmare to print.


It's hard to get perfect in Tinkercad but it prints flat.


Seven and a half-ish hours, not too bad. This particular print made me realize I had some more tweaking to go as the top right door piece had a void around the sides and the top on the back. Why the OP did that baffles me.


But they did print. Just a little bit of lifting on a few corners.


I also realized after this that the fill in the bottom pair was too thin. So I thickened it up a little.


Now I had been super resistant to Tinkercad because I like to have software on my computer so I can work on things offline. After a couple of friends showed me what they were doing with Tinkercad, I got over myself. Now I'm addicted to adding stuff to the bulkheads.


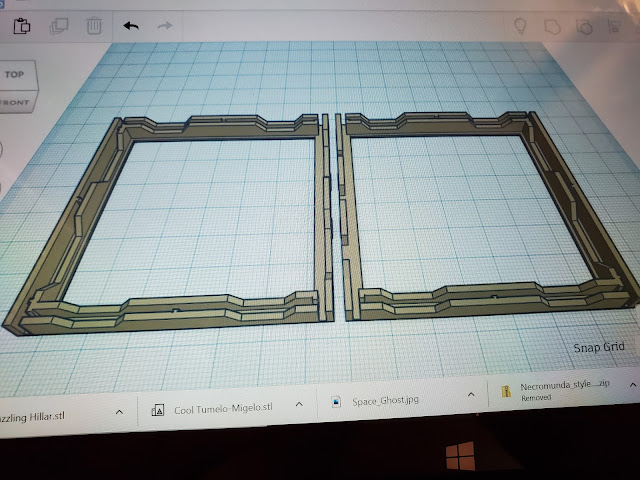
Then I remembered there were some bulkhead frames. I had to cut off the top handle on the right and some connectors between the two halves.


But I wanted to rotate the halves so that they sat on the plate like the other models, but I didn't know how to separate the parts. As you can see here, I figured it out.


A little verbose GoogleFu later.


Here's this guys video. Thanks Chaos Core Tech.

He's using an older version of Tinkercad, but you can still do what he says.

Thanks for looking, and I hope to have some habs to show you soon.


Thursday, May 14, 2020

Simple SciFi Building

Hi All,

Hope that stay at home protocols have been seeing you stay well. We're in the last 5 days or so of school.

I made some "improvements" to my printer that ended up not working for me, so I reverted back except I kept my Estep calibration.

In the meantime Cura 4.6 has been released and Tom Tullis of Fat Dragon Games has released new Cura profiles for terrain and miniatures.


I've since printed the missing walls. I think I'm going to turn this into a gun shop. I'll need to print out those things from the Tycho Streets and Bazaar set.

I've really been knocking my head against how to print this building out. There are a lot of overhangs that just don't print right for me. Part of the problem was the mods I made, but I also just can't figure out the best way to print it. I may just print the basic walls and then glue scifi bits to them. We shall see.

In the meantime I've finished painting all the dungeon tiles and hope to be tricking my wife and daughter into playing AHQ with us soon. One thing that is holding me up is I feel like I need to have some good female miniatures for them to use to feel more invested. Sadly I don't have very many and certainly not very many painted up.

Anyway, I hope to post a little more regularly and get back to checking in with your blogs, I've been a bad blogger for awhile now.

Happy hobbying.

Monday, April 20, 2020

Dangerous Dungeon Delvers

Hi All,

Just a little glamour shot of a few figures I had handy and some of the dungeon tiles I printed.


I've been alternately using the airbrush or brush for priming and like them better primed black.


Many of these were varnished and used for the photo. I've been using the airbrush to varnish them. Again to learn how to use the airbrush.


Just a little shot of the production line. Current process. Base coat black. Drybrush Charcoal, Hippo Grey, Rainy Grey. Spot drybrush Burnt Sienna and Territorial Beige. Sponge on Forest Green then Slate Green. Done. All of the paints are Delta Ceramcoat except for The Black and Slate Green, which are Americana (Or Vallejo Black Primer).

Thanks for looking.

Monday, March 30, 2020

3d Printapalooza

Hi All,

Hope your social distancing is going well. Mine has been ok. As usual a lot going on, but not a lot finished. I'm hoping that changes soon.

As mentioned in the title, I've pretty much been printing non stop since my last post.


I found out what happens when you have really, really good adhesion to the print bed. A little super glue fixed that right up.


My order of replacement bed parts came in sooner than expected. If you order from Amazon these days you can get some pretty long estimated delivery times for some items. Pictured above are the super skinny replacement mat, the glass plate I was going to upgrade to, and the stock binder clip that holds neither due to the thickness differences from the stock mat. Someone on facebook suggested Swiss Frame clips, so I have some on order. Later someone suggested painters tape to hold it and I wondered why I didn't think of it. Currently I'm printing with the skinny mat on top of the stock mat that I accidentally carved a chunk out of trying to pry my prints up.


I've been having issues painting these. I decided to take this opportunity to learn how to use the airbrush. It's going ok.


I've gone through my first kilogram of filament and moved on to the black filament. I found out that grey is the cheapest option of all, so I have 2 more spools on their way. As you can see I've also gotten bolder with my prints. I'm now printing all 6 wall variations at one time. Cura 4.5 said it would take just over 21 hours, but it has been taking about 19.5. I did try to weld the black to the white, but my join popped apart once it got to the filament feed. Fortunately I was printing clips and the print finished with about a foot of white filament to spare. That's an acceptable loss to me.


I also stumbled upon Dungeon Print Studio for helping me plan out what to print. Since I want to use these for Advanced Heroquest, I figured I'd try my hand at making some of the quest levels for The Shattered Amulet Campaign. It took some fudging as AHQ has some different dimensions than the Fat Dragon tiles. But I think I got it pretty well. The cool thing about this site is it also has other Fat Dragon Sets as well as other manufacturers models so you can plan out a lot of stuff. It then lets you print out a list of parts you need to print. Pretty cool. The one down side, more of a bummer really, is that I found out that the Fat Dragon space tiles I bought are not really going to work for Space Hulk. At least not without some modifications that I am not able to make at this moment

And finally, I'd like to welcome XarfaiEngel to the blog.

Thanks for looking, hope you are making headway into your miniature piles.

Saturday, March 14, 2020

Ender 3 - Doing it wrong until you get it right

Hi All,

Well it took a lot of trying and setting, and re-setting things on the Creality Ender-3, but I managed to get my first print done.

I thought, perhaps a little naively, that I could set it up out of the box and let it rip. It comes partially assembled and putting it together has a very IKEA furniture feel about it.

If you take the plunge I highly recommend the Official Facebook Group here. In the files section is an extensive guide for assembling and tweaking your Ender-3, written by Luke Hatfield. Also lots of people on the group who can give you help if you show them pictures of what is going on.

I also highly recommend Chuck Hellebuyck's Filament Friday (CHEP) youtube channel here, specifically this video with the links to his gcode for bed leveling and test printing to check the bed level.

The first thing I did wrong was pinch the z-limit wire under the vertical support beam. I had tried to hold it out of the way multiple times while assembling and didn't realize I had let it slip under once again. I pancaked the wire pretty bad in two places, fortunately for me it still works. I would advise taping it well out of the way while assembling.


The next problem I had was the cross beam that holds the print head. I had a 6mm difference between the left and right sides. CHEP talks about adjusting the left side and I did that about 5 times and couldn't get it right. Finally I loosened and re-tightened the right and got it straighter, fixing the difference to within 2mm.


I then ran the CHEP bed level, using a post it to set the nozzle height (not shown). Then I ran the test. Success! I ran my fingers over the corners to see if it was sticking to the bed. I then peeled that off and set a print I found on thingiverse to print.


I probably should have run the bed level code again. The lighter look of the line on the right seems to indicate the bed is too high on that side.


But I let it run and ended up with a pretty good first print in a little under an hour and a half.


I had some trouble getting the print off the print bed. The stock scraper was a tad too thick to get under a corner, but I had this tool for slicing clay and sculpey and it worked a treat.

I think I'm going to print up some more bits for making up sci-fi buildings. I've also got some Fat Dragon Games stuff for making dungeon tiles and Space Ship tiles I'm looking forward to trying out.

Thanks for looking, and I hope you can learn something from my folly.

Friday, November 6, 2015

Shapeways - Have you thought about buying from them?

Hi All,

At the end of September I was contacted by Pat Peverell from Shapeways about whether or not I'd be interested in blogging about the use of 3D printed models for the hobby and sent me links to their Miniatures and Model Train sections.

At the time I was rather busy and couldn't get to it. There was some mention in the initial email about sending me designs, along with more info, in the end I was only sent this info graphic of the process.


I was also given a link to their Tools page, for assisting in design of models if you are not versed in digital sculpting/ modelling. I only took a cursory look at that and played around with the Hero Forge for a couple of minutes before I got bored. I'm not really interested in making a custom miniature for my D&D Next character. It's a game I don't play.

Although most things I looked at in the above links were not my cup of tea, I did think there were some interesting options for those who game Naval or Air or Micro Armor. There were also a lot of things for people who use Model Railroad items for scenery and terrain. What caught my eye, however, was one shop in particular. Grim Dark Bits.

Why I liked this shop is it was making ships for Battle Fleet Gothic and some items for Epic 40K (Space Marine), both of which are no longer supported by Games Workshop. For some one, like me, who didn't pay attention to either of these games when they were initially released this might be an option for building up forces for these games. I haven't looked very hard, but ships and 6mm figures for these seem to be suffering from the same rise in prices on the internet that "Oldhammer" figures are experiencing.

The designer/ owner of the site himself says that he doesn't use the highest quality/detail prints for his fleets, as that seems to be pretty pricey. The reviews seem to suggest that the lower grades are good enough.

So my thoughts are, Shapeways looks like an interesting way to fill out pieces for smaller scale projects and gribblies for terrain.

I have yet to try it out though I suspect one or two resin bits I've purchased over the years have been casts of 3D printed models.

Do you have any experience with printed models in general or a Shapeways store in particular? What are your thoughts?