Friday, August 8, 2014

What's on the bench.

Just a quick post, more to keep up my painting and blogging mojo more than anything else.

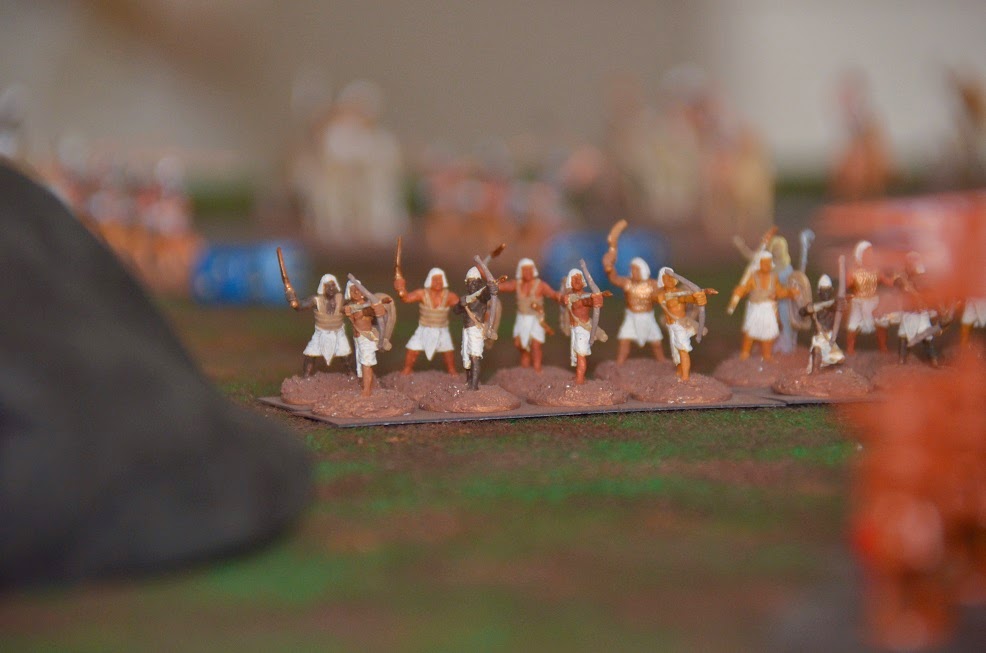
Here's a couple of shots from the other day of some 1/72 figures from the Caeser Fantasy Adventurer set.

Nikon D5100, 18-55mm lens, Macro (Flower Symbol) setting. Afternoon reflected sunlight.
I'll try to start captioning my photos with what I remember of the camera settings and conditions. These guys were all based and then primed gray. I wanted to try different things with the flesh so three of them have territorial beige (?) as a base flesh color while the odd one out has the yellow ochre to provide a base for Dwarf Flesh. Wartchemakalit (2nd from left) has also had her hair done in Camel I think. Nanoc (far right) has had bestial brown applied to the leathery bits, Botgun Metal on the sword, and some kind of brown (probably Burnt Umber) on the hair.

D5100, 18-55mm lens, Macro Setting, Afternoon sunlight, brighter day?
So I did a little work, apparently fixated on "Not Legolas" (or I guess by my naming convention, Salogel.) The figures with the darker base skin tone have all had Reaper 09045 Tanned Highlight painted on. Nanoc in particular looks a little like how Arnold was painted up in "camouflage" in the 80's Conan the Barbarian.


Well maybe not even. Anyway I ran through all of my new Rosemary & Co brushes and I want to say I did the edge detail on Salogel's tunic with the #1, although it might have been the #0. I got #2 down to #2/0 and they all hold a nice point.

Next up I brought out my oldhammer ball & chain fanatics and Goblin Shaman.


During the Anologue Hobbies painting challenge I painted their flesh in Hauser Light Green. What shocks me now is that a quick perusal of the internet shows nothing but Night Goblin Fanatics.  I personally found the Night Goblins to be a total cop out sculpting wise. For me a sea of robed figures is "BORING".


In the above picture I was trying to show the painting of the foot wraps. This is 9AM-ish sunlight through te blinds, directly down onto the table. Too many shadows etc.


Same time, blinds adjusted to be parallel with the sill causing no direct sunlight. Much better. The first of these three was taken in the afternoon. My window faces East, so more direct light in the morning. All of these were also with the Nikon D5100; 18-55mm lens; Macro setting.  One other thing I'll note is that in these last two pictures there is a little too much clutter around the figures. The Macro setting can be your friend, by having a short depth of field, but you need to take into account that even blurred out clutter can be distracting. Especially if it is a bright color.

Welcome to R.A.E. Gingerbhoy of Gingerbhoy's Painting Projects, a fine painter and figure converter.

Thursday, August 7, 2014

Photographing Miniatures part 1 - My gear

I have been thinking about photography, among other things, again. While I was in the middle of thinking about this r.a.e. gingerbhoy of Gingerbhoy's Painting Projects was talking about how he felt he was losing painting competitions because his pictures weren't as good as his opponents. I'm paraphrasing, but you get the idea. This is a big topic, and I don't pretend to have all the answers. But I do have some opinions.

I think I'll try to do a series and see what some of the answers are. But for this one I'll talk about what equipment I use. It's a bit narcissistic, but so is blogging in general.

I have been using a Nikon D5100 for the last couple of years for most of my photography and have been fairly pleased with the results. I bought it on sale at Costco ( a big warehouse store in the US) and it came with a camera bag, 18-55mm and 55-300mm lenses. You can see their current deals here. It's a lot of money, but I use the camera a lot now. Before I would carry around smaller digital cameras and never bring them out. With the big expensive camera I feel compelled to use it to justify its purchase. Although I still forget to break it out at family gatherings and social settings.

Now we could leave off there, but there are a few things that I've acquired since the initial purchase that I find useful. First, especially for shots of miniatures, you need a tripod. I have a standard one from years ago which works fine, but I recently bought a Gorilla Pod flexible tripod. I use it to set up on the game table. I'm still working with it. I think it could be very useful, but so far I haven't done that much with its unique features. I also have a monopod. I use it for photographing outdoor sports, it really helps to get better shots when the kids are running around and you don't have a lot of time to set up the shot. I can't remember if mine was this Dynex one, but I'm pretty sure I didn't pay a lot for it.

Second would be the flash diffuser. Lighting can always be an issue, and to be honest, I don't think I've gotten it licked yet. The diffuser I bought was recommended by Dave D here. (In fact I could have just skipped this whole post and just sent you to Dave's post. It is essentially how I take my pictures now. But I digress.) This gadget really helps dull the harshness of the flash. One day I'll try the other colors, but i use white. I got mine from Amazon here.

Third would be some kind of infrared remote. You can set the timer, but the remote is dead easy to use and takes away any nudging or vibration of the camera. I bought a generic one from Target here, and it works great. Just make sure that the camera has something to focus on. The first time I tried it I think I had the object inside the cameras focal length and it refused to take the picture.

Fourth item is a good camera bag. Now the camera I bought came with a bag, so you may be thinking, why does he need another bag? Well, although serviceable, the bag isn't all that comfortable or easy to get the camera out of when you are running around historical sites. So I bought a sling bag and it's been great. I got the Lowepro Slingshot 250W and it's been great. I will say that the single strap, although great for camera access, can be a little fatiguing when you are on a death march through the Louvre or trying to cram in a lot of site seeing in one day. One salient feature, that I haven't had to use yet, is an integral rain cover that pulls out. Great for sunny old England, although we had hardly any rain during our visit in March.

The last thing I bought, and it is totally unnecessary, was an 18-300mm lens. The stock lenses are very good, but I've been caught many times in sports or on vacation where I had the wrong lens for the job and missed the shot. My solution was a lens that could do a little of everything. I bought this one used, again from Amazon. It is not uncommon for a lens to cost more, sometimes multiples more, than the camera body itself. So you need to get over sticker shock and sort out your price range and what you want from the lens. My hope is that I can get the closeups on the football field and then take a portrait of the team, all without having to try and do a lens change with little time and a lot of dust and dirt flying around.

So there you have it. My fancy camera gear. Next I'll look into various resources for taking good pictures of your minis. I'll try to follow that up with some examples of a setup and try to show the difference between different kinds of cameras. Lastly I may try to look at some examples of miniature photography and see if I can get the photographer to share their process.

Happy picture taking. Or is that camera shopping at this point.

Tuesday, July 29, 2014

X-Wing - Game 1 - Political escort

Hot on the heels of the Battle Cry game, my son asked to play X-Wing. We decided (or was that I decided) to play the first mission in the back of the rule book, but using the very basic quick start rules.

Here's how it went.


It was over fairly fast. My son flew in with the Ties and broke up my formation, but tail gated the shuttle. In my reading of the rules you can't take a shot if you are in base to base contact. I tried to persuade him to ease up on the accelerator. There were many tears after I shot down the one TIE. I'm not totally sure why as I thought we were passed the "it's only fun if I win" stage. So it may be some solo X-Wing in my future.

Sunday, July 27, 2014

Battle Cry - Game 1 - Pea Ridge

Well I finally went and did it. I played my first game of the 10 games 10 times challenge. It was the second scenario from the rule book, Pea Ridge. The ccbattlecry.net version is here. It surprised me that I hadn't played Battle Cry since Oct 8th, 2012. That post did remind me of a bunch of links for playing the game solo. I ended up playing the way Barks did here. One thing I added, albeit midway through the game, was a rule for those cards that talk about ordering the number of units equal to the cards in your hand. Since this solo version only ever has you draw two cards at most, use the commanders rating (ie how many cards they can hold) for this number.

(Well shit. I wrote the rest of this post from here and then it wouldn't publish. Apparently it didn't save either. Thanks blogger.)

It took me a couple of days to put this together, my notes were lacking and memory faded so hopefully this makes sense. As always, it will take me a few tries to hit the sweet spot.


Welcome to Darcy Perry of Hits to Kill, who has some awesome Oldhammer chaos on the page right now. I love the Slaanesh champion. He also writes several music blogs, but I can barely keep up with the hobby stuff right now.

More to come soon.

Thursday, July 24, 2014

Painting supplies and a Welcome

Well... my back is pretty jacked up. I finally went in to the chiropractor and he said I had strained the Psoas, Quadratus Lumborum and Gluteus Medius as well as caused some disc irritation. You haven't lived until you've had someone dig their fingers into your abdomen while you try to raise your leg behind you. Good times.

In the interim I've ordered and put together a nail polish rack to hold my paints. I believe I first heard about this from Big Lee, it's only taken a year or so to implement. Interestingly enough the craft paint bottles appear to be similar in size to nail polish bottles, so I can fit 60 of them in the rack. I got mine on Amazon here.

I should have bought two.

I also decided to buy some of the Nail Polish agitator beads after watching Les Bursley's video on stirring paint. I got them here, 100 ball bearings don't seem like a whole lot when you get them in.


I haven't tried it yet, but I have had paint gush out of the dropper bottles on me so I wanted to try this. I also haven't put the dropper bottle in my drill chuck yet.

I'm also excited to try my Rosemary & Co. Series 33 brushes, once I can sit in a chair with out passing out from pain.

Good service and I had no problem with customs.  These are short handle, pointed.

Before I go I'd like to welcome Faux Gamer of Nerdus Interruptus. Some interesting thoughts on movies etc.

Instead of bombarding you with a stream of consciousness, I'm going to try and keep things around a single theme. Perhaps reigning it in in this way will help me to regulate posting more effectively.

Monday, July 21, 2014

10 games, 10 times. The 10 x 10 challenge.

Since I've been bed ridden the last two days with a bad back, I thought I'd take some time to think about the 10 x 10 challenge.

I believe I first read about it here on the Itinerant Gamer and then here on Tabletop Diversions.

I don't believe I'll bother with posting it to Board Game Geek, or worry about getting 100 games in over the next five months, but just try to select games that I want to play and play them. So while I was lying down and trying not to have a back spasm, I came up with the following list:


  • Battle Cry
  • X-Wing
  • Death Angel
  • Machinas
  • Roman Seas
  • Armor Grid
  • Warhammer Fantasy Battle 3rd Ed.
  • Squad Leader
  • King Maker 
  • Swordplay
So lets break these down a little.

Table top games:

X-Wing, Machinas, WFB 3rd Ed, and Swordplay all fall into this. Roman Seas and Armor Grid could also fall into this category or be their own category since they are both print and play.

Board Games:

Although Kingmaker and Squad Leader are what I would call "War Games" they are from the subset of games that were played on solid game boards with cardboard chits. As opposed to other games that had folded paper maps. Battle Cry has more of a parlor game feel to it, like Risk but is still fairly nuanced.

Card Games:

Death Angel was, surprisingly, the only card game on the list. We have played a fair amount of Munchkin around the house, so that may be why I didn't think to include it.

So I'm hoping to play some new games and break out some old ones that haven't seen the light of day in a long time.

And if you think to try this out for yourself, let me know how it goes.

I'll try to get the ball rolling this week.

Friday, July 18, 2014

Finished figures, Pine Bark, Magnets, and a new lens.

Hi All,

I've been rushing to get these figures finished and realized a few omissions late in the game. I won't dwell on the half empty aspect.

I give you the Blood Moon Boyz:


At first I wanted to paint them for Orctober 2013. This then got pushed back to Curt's challenge and they were supposed to be the first unit I painted for that. They sat there about 80% as i tried to meet the bonus rounds and never got done. As is usual for me they don't rank up perfectly. I tried to vary the shield position to make it more visually interesting. I thought I had some fluff already written for them, but all I found were notes.

"The Blood Moon Boyz are the militant wing of the Orcish Revolutionary Council (O.R.C.), not to be confused with the Orcish Revolutionary Coalition. Splitters! They are part of an Anarcho-Syndacalist commune that allies with other groups of Orcs to kill things and spread the words of Karl Orx and Froedrich Mangels. They have no banner, as that is a trapping of the self perpetuating autocracy, and they have no permanent leaders but rather appoint a rotating executive officer for the week."

On these guys I used my usual method of block color, grunge wash, drybrush highlight and then a few spot details. The bases are my current method with the clay, texture gel and sand followed by flock and static grass.

Next up is my Roman command:

Thentuwion! Thwike him vewy wuffly!


These guys are okay. I got into get it done mode and now see how I could have made them better.Oh well. The only thing I really worked highlights on was the lion pelt worn by the Signifer. These guys are 1/72 Italeri plastics from the Roman Infantry Set 6021.

My new strategy is to try and work on 4-5 figures at a time and get them done. That way I can stop playing with half painted armies.

Here's that pine bark I picked up near Echo Summit:


Although I already have a ton of stuff for making rocks, I couldn't resist.

Magnets:


I hadd been looking for the push pin magnets for some time and finally found them at Staples. Each pack cost me $3 and some change.


My plan is to use the push pin ones for mounting a wire to hold banners and/ or markers. We'll see how that works.


Bob Cordery showed how you could use these to hold metal base figures for painting. I read about it here, but he also wrote about it here. Or it could just be a floating disc for your wizard.

Lastly, I bought a new lens for the camera, all these pictures have been taken with it. While on vacation I got an email about an Amazon warehouse sale. One of the things thy had was camera lenses.  I found an 18 - 300 for $100 less than retail and became enamored with the idea of having one lens for all occasions when I am travelling or taking pictures at Football games and changing lenses is inconvenient. So far so good, although I still have a ways to go in learning how to use it, or the camera for that matter.

I'll leave you with a parting shot illustrating the one new cool feature. You can dial in depth of field.


For some reason I couldn't do it quite as well on the finished figures.