Friday, July 29, 2016

The Sword of Light and Good - An Oldhammer Battle Report

Hi All,

I finally have some good WiFi and a little time, so I finished putting this battle report together. This was a learning game with lots of house rules and flavor added by the GM. I hope it inspires you to dust of your minis and use them in anger.

(As always, right click on the image and open in a new tab/window to see it in its full bigness.)


Thanks for looking.

Saturday, July 23, 2016

Magnetizing Jewelry Trays for transport.

Hi All,

Well I'm back in the land of Wi-Fi, albeit super slow, so I thought I'd share my experiences with making a new set up for travelling with miniatures.

So I think I talked about this in a previous post after getting back from Oldhammer Weekend USA 2015. Some of the guys had these hard sided jewelry cases and trays, some had plastic containers with sheet metal epoxied in. I decided to marry the two ideas and have sheet metal glued into jewelry trays. Perhaps not original, but an idea none the less.

Kober recommended Nile, and Blue recommended Gems on Display. I went with the latter as it was the same stuff, only sightly cheaper. I had wanted to do a hard sided case, but I also wanted to do carry on and the dimensions on the hard sided cases were about 1" too large in at least one dimension.

Melania'd from the American Airlines website:

Carry-on
Shouldn’t exceed 22 x 14 x 9 inches / 23 x 36 x 56 centimeters (including handles and wheels)
Must fit in the sizer at the airport

So I went with this soft sided case here. Now you'll notice that it says you can fit 12, 1" trays in there. I got excited about fitting 12 trays in and stupidly ordered them. Anyone paying attention will immediately realize that a 28mm figure is never going to fit in a 1" tray and be able to stack stuff on top of it. So much for enthusiasm. Gems on display would have taken them back and given me money back, but the shipping would have been more than they were worth. So I now have 12, 1" trays. I'll use them for dice rolling and organizing the paint queue, etc.

What I ended up with for travel was 2, 3" trays and 3, 2" trays. They don't appear to make larger than 2" in the stackable plastic. A shame, but it worked out ok. I may in the future figure out how to fix something on the bottom of the three inchers to keep them from shifting.

Next I ordered some custom sheet metal plates from Robert over at Shogun Miniatures. We played a minimal amount of email tag and he got the metal out to me quickly, ie well before I was going on my trip to Baltimore.

Let's see how I put them in the trays, shall we?


Test fit and double check of magnetic properties. (Also a shot of my feet)


Setting up an area outside to epoxy.


I used 120 grit to rough up the sheet metal, I probably should have used a coarser grit but I had 120 handy.


I realized a little late that I didn't need to put a full stripe of glue across.


I used Gorilla brand two part epoxy. They recommend mixing it in the plastic blister but I just applied it directly and mixed it on the sheet metal itself.


The pictures don't show it, but I did 3 strips of epoxy on each plate. I was  able to glue 5 plates in with one tube of epoxy, but just barely.


Fortunately I have a bunch of old bricks and pavers lying around my back yard so I used those to hold down the plates while the epoxy cured.


So now I can fit almost my entire O & G army in one plus tray. I had a little difficulty fitting my clothes and Oldhammer t-shirts in the remaining space, but I made it to Baltimore and back with only one figure broken.

The figures did shift a little in transit, tipping the bag over to fit in the overhead compartment, so I may need to figure out some more ways to restrain the figures once inside. The idea is to have them as tightly packed as possible.

I'd also like to welcome two new followers, Warcolours Paints and Idrissa-Flo Woodstone. I don't know if they have blogs, send me links if you do. I believe I know Idrissa under a slightly different name on facebook. A damn fine painter.

I hope this post is helpful and that I'll get some more reports written soon. I don't know why the followers widget is so small right now. I'll have to check the settings.

Have a good one.

Sunday, July 17, 2016

Brian's Birthday Bash - an Oldhammer Weekend

Hi All,

Just wanted to share a brief synopsis of last weekends shenanigans.

I would like at some point to do a semi-regular zine of what's going on around North America so we can enable each other to buy more toy soldiers.


Thanks for looking.

Monday, July 4, 2016

From the depths of the painting queue, Cthulhu rises!

Hi All,

  Well I finished that huge Cthulhu model last night so I thought I'd share my painting "notebook" of the process.

  I started with a plan.


I decided to use this picture as a reference and ran it through the adobe color custom palette thing to get an idea of the colors. I ended up skipping on the purples and blues, but that was mostly a time issue. Also I've done purple tentacles a couple of times already.


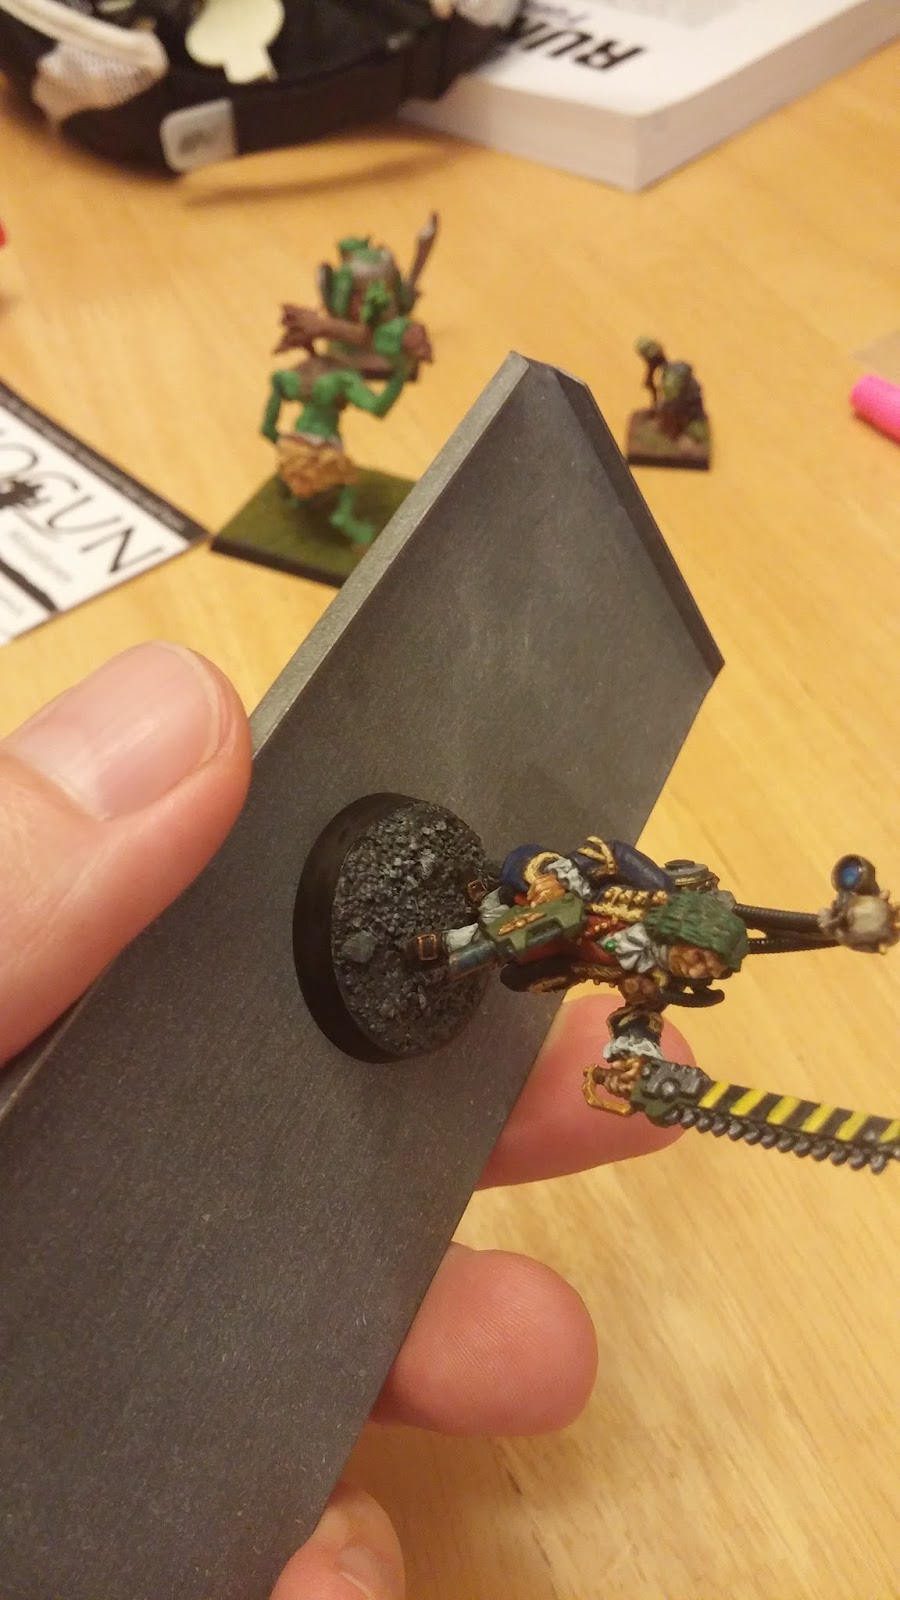
So here he is dry fit with Abdul Goldberg for scale. Next were some shennanigans with various putties.


I used a 50/50 mix of green stuff and milliput yellow until it got unworkable. I then tried to finish it up with Tamiya.


DO NOT use Tamiya putty on bones. It is worthless.


After chipping off the worst of the flaky Tamiya I just used straight up green stuff to salvage the mess.


Spray paint.


Brush on more paint because the spray paint feels tacky and leaves a powdery residue on your hands when you pick it up.


Slather it in a black ink wash to preshade and further try to seal things down.


I got the idea to do all the belly, under arm inner leg stuff the lightest color.


I wanted to transition but the edges were super hard. One issue with craft paint is that some are super viscous. Getting them to flow but also cover was a constant battle. Each color probably got 3 coats.


In the thumbnail i thought this might show the stippling of the transition layer, but it just seems to be a different angle of the last shot.


Decide that you're going to need a beer to get this @#$&ing thing finished. (Four Peaks Hop Knot for scale) Decide that three beers was maybe one too many to efficiently paint.


This picture shows the transition stippling on the belly and a little on the spine. Start stippling Zinc on the head, hate it and then go for it with charcoal all over using a size 2 brush.


Paint in the veins and eyes, then dry brush the gray parts. Then slather the whole thing in "grunge" wash. (4 parts Raw Umber, 2 parts Burnt Umber, 1 part Black ink) This batch of was is a little dark and I accidentally let it pool in weird places, but I think it got the look of being dredged from the depths.


One more shot to try and show the spots etc. I need to take some "studio" shots of these latest figures. After I varnish them of course.

Anyway, thanks for looking. If you have one of these bad boys I'd love to see how you paint him. Who knows he may even make it to Oldhammer weekend.

Saturday, July 2, 2016

Paint Table Saturday 139 - Finished Chaos Warriors and starting Cthulhu

Hi All,

Just a quick update on this holiday weekend. Hope you're having a good one.

Earlier this week, Thursday night, I finished up those five chaos warriors for the Herohammer International facebook group.


I was trying to blend up the Green, Red and Pruple warriors. I thik the time spent to results ratio is not good but they've been sitting unpainted for decades, so I'l take it.

The Champion of Tzeentch in the middle I bought from Blue sometime last year. I was trying to build up yellow from orange. It mostly looks orange and not super smooth. He came out mostly how I envisioned but i ran out of time to highlight his horns. The Marauder guy on the extreme left was a repair and repaint of a miniature I gave my brother back in the day which he returned to me when I got back into the hobby.


This is what he looked like when I got him. I tried to pay an homage to the original paint scheme. Again, time was a factor, so I didn't get to work as many layers for his "black" armor. I also thought I had a good plan for the red chainmail, but it didn't quite work. Overall I think I captured the idea. The color palette is similar without being the same.

Today I have been working on that big honking Cthulhu.


I'm trying to build up tans and browns to give it a more realistic Octopus color scheme.

Hoping to get this guy done this weekend since The Bazaar of Crooked Wonders extended the June "Big Things" comp one more week.

I'll leave you with a link to an interview that Airbornegrove26 did with Nigel Stillman. Great stuff if you really want to know where Warhammer came from. Read it here.

Happy painting.

Friday, July 1, 2016

Shogun Miniatures = Great Service

Hi All,

  I finally put in an order to Shogun Miniatures for some movement trays after Chris McCandless recommended them to me at last years Oldhammmer USA Weekend.

  As you know I'm a do it yourselfer, but the price and quality of the trays can't be beat. Very nice metal, expertly cut and not a burr or sharp edge to be found.


 I think this one is for 2 ranks of 5 25mm square bases.


Abdul with a magnetized base, sticks pretty well.


I just used my Loctite gel superglue to attach the magnet. It seems to hold fairly well, I wouldn't thrash it around though. I'd also recommend putting the magnet in a more central location.


These magnets appear to fit perfectly under both official GW bases and my Chinese knockoffs.

You can order them directly from K&J Magnetics here. I just ordered another couple hundred to prep for Brian's Birthday Bash.

My next post will be Paint Table Saturday and then I'll follow up with the Jewelry trays and custom sheets from Shogun that I'm using for transport this year.

Stay tuned.